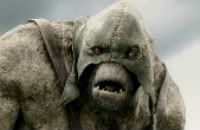
All times are UTC


It is currently Thu Jul 04, 2024 7:55 am


Post new topic Reply to topic  [ 135 posts ]  Go to page Previous  1, 2, 3, 4, 5 ... 7  Next
Author Message
 Post subject:
PostPosted: Wed Mar 31, 2010 4:54 pm 
Loremaster
Loremaster
User avatar
Offline

Joined: Fri Jan 18, 2008 5:03 pm
Posts: 1984
Location: Manitoba, Canada
Images: 1
These are looking really good, easy, and cheap. The three best things possible! 8) :-D Is it just normal sponge? What colour was the sponge originally? I think I might have a try at this, it looks nice and simple to do. :)
Top
  Profile  
Reply with quote  
 Post subject:
PostPosted: Thu Apr 01, 2010 1:33 pm 
Craftsman
Craftsman
User avatar
Offline

Joined: Mon Aug 31, 2009 10:27 am
Posts: 446
Location: Chiang Mai, Thailand
Images: 2
Great work. I've seen a few tress made from sponges but they didn't look anywhere near as good as these. I'll have to give these a try, adding them to the longs list of things from your WIP to try.

The warg rider looks pretty good. I would suggest you add some more details to the bases as at present the stones stick out a little too much and a few more details would give the base more balance and look more complete.

_________________
“But God demonstrates his own love for us in this: While we were still sinners, Christ died for us.” -Romans 5:8
Top
  Profile  
Reply with quote  
 Post subject:
PostPosted: Thu Apr 01, 2010 3:48 pm 
Craftsman
Craftsman
User avatar
Offline

Joined: Sat Sep 27, 2008 5:15 am
Posts: 309
Location: Ireland
theavenger001 wrote:
Is it just normal sponge? What colour was the sponge originally?


cheap and easy.. the golden words in terrain making :-D . just normal sponge, i bought one big one coz their better than the smaller ones. The yellow is the sponages normal color, kind of nice in its own right, golden Autumn.


Last edited by BizzareWarstar on Thu Apr 01, 2010 4:13 pm, edited 1 time in total.
Top
  Profile  
Reply with quote  
 Post subject:
PostPosted: Thu Apr 01, 2010 4:10 pm 
Craftsman
Craftsman
User avatar
Offline

Joined: Sat Sep 27, 2008 5:15 am
Posts: 309
Location: Ireland
Dwarf Lord of Ered Luin wrote:

The warg rider looks pretty good. I would suggest you add some more details to the bases as at present the stones stick out a little too much and a few more details would give the base more balance and look more complete.


I'm gonna add little bush's n grass and all that to the warg along with the orcs and others. I was going to paint the warg again, badab black on the fur coverd up all the brown and made it alot darker, i'll just not use so much next time.

I made some sponge trees before, didn't put the time in shaping the foliage so they didn't turn out so great. the tweezers makes a big difference in making it look like clump foliage i highly recommend using one and don't forget to have a vacuum cleaner handy for the hundreds of tiny static sponge pieces.
Top
  Profile  
Reply with quote  
 Post subject: sponage trees finished
PostPosted: Thu Apr 01, 2010 4:25 pm 
Craftsman
Craftsman
User avatar
Offline

Joined: Sat Sep 27, 2008 5:15 am
Posts: 309
Location: Ireland
Image
Painted black with a generous dry brushing of grey, with a final dry brush of white.

Image
Watered down Codex grey painted on the stones and added some details. I used a small bit of watered down Scorched brown on the edges and in patches going towards the center.

Image
Done. I only glued the top part of the foliage on to keep it in place the rest stayed firmly without any glue.
Top
  Profile  
Reply with quote  
 Post subject: Dragon conversion and more trees
PostPosted: Mon Apr 05, 2010 6:58 pm 
Craftsman
Craftsman
User avatar
Offline

Joined: Sat Sep 27, 2008 5:15 am
Posts: 309
Location: Ireland
Dragon conversion

Got this dragon from the Beast and Beings magazine that came out some time ago and thought of converting him for sbg. left it for ages and forgot i had it until i came across ukfreddybear's cool conversion of the same miniature.
Image
Image
Image

There was an egg in his hand which was also pressed against his belly, used a power tool with various heads to sand away the egg. put a vacuum cleaner out the window to extract the horrible smell of hot plastic and also to gather the unwanted resin powder.

thinking of mounting him on an old cd or two coz i cant think of anything else that is 180mm. Some green stuff work on his wings , belly and face before i undercoat. Was trying to think of something cool for his facial features but i cant see much beyond making the horns, teeth and perhaps the tongue larger, any suggestins are most welcome.

more trees..
Image
Top
  Profile  
Reply with quote  
 Post subject:
PostPosted: Mon Apr 05, 2010 7:43 pm 
Elven Elder
Elven Elder
User avatar
Offline

Joined: Mon Jul 27, 2009 5:57 pm
Posts: 2760
Location: Belgium, Aalst
I like your trees , i really should get more sponge :D

_________________
goblin: "people associate me with boogers because i am green"
Top
  Profile  
Reply with quote  
 Post subject:
PostPosted: Mon Apr 05, 2010 11:41 pm 
Loremaster
Loremaster
User avatar
Offline

Joined: Fri Jan 18, 2008 5:03 pm
Posts: 1984
Location: Manitoba, Canada
Images: 1
I look forward to more on the dragon....Are you going to put putty on the wire that makes up the tree? If so I assume the sponges is not glued in place yet? :)
Top
  Profile  
Reply with quote  
 Post subject:
PostPosted: Tue Apr 06, 2010 5:17 pm 
Craftsman
Craftsman
User avatar
Offline

Joined: Sat Sep 27, 2008 5:15 am
Posts: 309
Location: Ireland
theavenger001 wrote:
Are you going to put putty on the wire that makes up the tree? If so I assume the sponges is not glued in place yet? :)


i was going to use pva and thin paper like Rizla or toilet tissue, they nearest i have to putty is modeling clay (the stuff with the hair like fibers in it) which can be quite brittle and heavy. But that you mention it I think i will use some on the bottom of the tree for better details and work it into the paper on the lighter top branches. yeah the sponge hasn't been glued yet. thanks for the suggestion :)
Top
  Profile  
Reply with quote  
 Post subject: dragon greenstuff
PostPosted: Tue Apr 06, 2010 10:30 pm 
Craftsman
Craftsman
User avatar
Offline

Joined: Sat Sep 27, 2008 5:15 am
Posts: 309
Location: Ireland
Image

Image

Image
Top
  Profile  
Reply with quote  
 Post subject:
PostPosted: Fri Apr 09, 2010 11:30 pm 
Loremaster
Loremaster
User avatar
Offline

Joined: Fri Jan 18, 2008 5:03 pm
Posts: 1984
Location: Manitoba, Canada
Images: 1
I found some sponge but it had varying sizes of holes, some were really large. Did the sponge you used have uniform holes? The stuff I was looking at was just some cheap stuff, did you use cheap stuff or was it one of those sculpted soft ones you would use in the bath?
Thanks :)
Top
  Profile  
Reply with quote  
 Post subject:
PostPosted: Sat Apr 10, 2010 7:02 pm 
Craftsman
Craftsman
User avatar
Offline

Joined: Sat Sep 27, 2008 5:15 am
Posts: 309
Location: Ireland
theavenger001 wrote:
I found some sponge but it had varying sizes of holes, some were really large. Did the sponge you used have uniform holes? The stuff I was looking at was just some cheap stuff, did you use cheap stuff or was it one of those sculpted soft ones you would use in the bath?
Thanks :)


It was one of those sculpted one, it was large but bought cheap in a nik-nak shop, it had some holes but nothing to big or uniformed, when the did appear i used the hole as apart of the shape, plucked it a little to get rid of the uniformed curves.
Top
  Profile  
Reply with quote  
 Post subject: Painting Wargs, Dragon conversion, wire tree.
PostPosted: Sun Apr 11, 2010 2:07 am 
Craftsman
Craftsman
User avatar
Offline

Joined: Sat Sep 27, 2008 5:15 am
Posts: 309
Location: Ireland
Wargs
Image

Image

Wargs;
black undercoat and dry brushed codex grey sparingly with a moist brush to lessen the chalky look. 1:3 scorched brown and water for a secondary under coat to unify the whole thing and get rid of the really black black.

Fur;
used a mix of around 1:3 paint and water but spared it on the brush, concentrating on small areas rather than trying to spread it all over and also making sure each application was a little nearer to the top than the last.
Continued this processes working my way through Scorched brown, Bestial Brown, Kommando K and Bleached bone.
SB- from knees up.
SB+BB- from shoulders up.
BB+KK- from top neck up.
KK on top with a dry brush of bleached bone.

So once I began painting with bestial brown i used that to gently highlight the scorched brown after i had applied the layer, the same was done to highlight the bestial brown when i got to applying the kommando K, make sure not to smother the previous color with the next one up with these highlights. it just helps the colors blend that bit better also and diffuse the sometimes obvious paint transitions.
I was trying to emulate the way Hyenas look when rambling around, very dark on their under belly and legs with the color emphasis on the upper half, particularly their shoulders and face.

Light brush of bleached bone on the upper most fur.
The legs and feet where virtually left untouched receiving only a few licks of scorched brown for a subtle highlight. nails on two of them where painted codex grey.

Face;
Still only dry brushed fortress grey a mix of Codex grey 1:2 water was applied to the ears, noise, eyes, cheek and jaw; swiping the brush towards the highlight area each time. Built up these areas with 2 or 3 layers then gave the entire face one single coat always finishing the brush stroke on a highlighted area to save grey pooling in the shadow areas.

Teeth painted the same way using bleached bone. the tongue and gums also using 3 layers straight over the fortress grey dry brush.

When all was painted I mixed Scorched Brown, Chaos Black and water, 2:1:2 respectfully and used a fine detail brush to swipe between different areas such as between straps and cloth, skin and armour etc.


Image
fixed a missing spike i never noticed before and attached a nose horn.

Image
Found a really old tube of filler and tried one bit just to see what it was like, the stuff was half way hard but just ductile enough to get some texture on there so i kept going with it.
Top
  Profile  
Reply with quote  
 Post subject:
PostPosted: Sun Apr 11, 2010 3:24 am 
Elven Warrior
Elven Warrior
User avatar
Offline

Joined: Mon Mar 15, 2010 11:38 pm
Posts: 584
Location: Fighting a Balrog on some mountain.
Images: 8
Over all Great work, :D . However IMHO i would fix that gap where the neck meets the body on the warg (the one with the goblin with shield on him, though the others may do the same) because it detracts from the model.

Other than that, good job.

_________________
http://noddwyr.wordpress.com
Top
  Profile  
Reply with quote  
 Post subject:
PostPosted: Sun Apr 11, 2010 9:07 am 
Craftsman
Craftsman
User avatar
Offline

Joined: Mon Aug 31, 2009 10:27 am
Posts: 446
Location: Chiang Mai, Thailand
Images: 2
Great work. I really love how you've painted the orcs, though as Noddwyr said the gaps let them down.
The horn on the dragon was a great idea. It will be interesting to see where you go with it. Though, as you suggested earlier the teeth could be a little bigger.

_________________
“But God demonstrates his own love for us in this: While we were still sinners, Christ died for us.” -Romans 5:8
Top
  Profile  
Reply with quote  
 Post subject:
PostPosted: Sun Apr 11, 2010 10:25 am 
Craftsman
Craftsman
User avatar
Offline

Joined: Sun Mar 12, 2006 3:48 pm
Posts: 461
Location: Siedlce, Poland
Images: 7
Lovely job on those Orcs :) They're a great paintind standard, clean yet battle worn. And I will join my forespeakers in the matter of neck area on wargs ;)

_________________
My WiP thread

www.independent-painters.blogspot.com/
Top
  Profile  
Reply with quote  
 Post subject:
PostPosted: Sun Apr 11, 2010 1:47 pm 
Loremaster
Loremaster
User avatar
Offline

Joined: Tue Nov 30, 2004 8:23 pm
Posts: 2367
Location: Hobbiton, The Shire http://botwt.wordpress.com
Wargs look wonderful!! :yay:

_________________
No one feels as helpless as the owner of a sick goldfish.
Top
  Profile  
Reply with quote  
 Post subject:
PostPosted: Fri Apr 16, 2010 3:07 am 
Craftsman
Craftsman
User avatar
Offline

Joined: Sat Sep 27, 2008 5:15 am
Posts: 309
Location: Ireland
Sound guys thanks :) got two barrow wraiths painted, couldn't take pictures though coz the camera fell into my dogs bowl of water :/ have a mordor troll undercoated also.

@Haldir_sfan.pl; im glad to hear that, its something i was hoping to achive.

@Noddwyr;
Would you really go back once it was all finished ?
I find it healthy not caring so much about how miniatures will turn out sometimes because its easier to experiment with when you've already made a sack of it :P I wont make a habit of leaving gaps and flash lines but it dose happen now and then.
its kind of like by leaving that gap the goal was shifted from having a great end result to improving the processes of achieving it :)

@Dwarf Lord of Ered Luin;
sound man, i was happy with the horn, i tried it out first with blu-tac it was cool enough looking, took it off and it looked so bare.. it kind of guides your eye towards the wings which draw your eye back down to the head and around again. Larger teeth would be cool but its gonna be so difficult because of the tiny space plus the almost non existent teeth he has now will be hard to built up on. I dunno what to do about them atm.
Top
  Profile  
Reply with quote  
 Post subject: barrow wights, shade, mordor troll.
PostPosted: Sun Apr 18, 2010 2:24 am 
Craftsman
Craftsman
User avatar
Offline

Joined: Sat Sep 27, 2008 5:15 am
Posts: 309
Location: Ireland
Image
bases painted bestial brown, just got to add a little base detail before matting. 12 more orcs still left to do and wouldn't mind adding some army of the dead.

Image
Image

all mix's are watery and flow smooth, brush is never loaded with paint or water, less is more stuff.

cloth & skin;
codex grey, start in the shadows and lift the brush off on highlights. concentrate on mid tones with each layer, the highlights will be almost pure codex grey.
fortress grey in the same manner working from the mid tones towards the highlights. bleach bone streaked across the highlights, this just tones down the fortress grey a bit, its no more than a hint. a little water down shadow grey in some of the folds and creases, just barley enough like the bleach bone.

skin; a wash of goblin green 1:3 parts water, no pooling. gave it another coat of this, wasn't really working so i watered down some thraka green and applied it which did the job, added a slight shine but it wasn't to much.

eye; wash's of goblin green 1:3 parts water. painted the entire socket and check bones and worked in towards the eye ball with each layer which was around 4 maybe with the last brush stroke being slightly loaded. the eye ball was picked out with skull white.

metal; boltgun metal 1:2 parts chaos black all over. boltgun metal on the highlights and some of the mid tones. badab black was used in the shadows. a few layers of watered down brown ink was used on the gold areas to tint the mental.


touched up some shaded areas like between the fingers, hair and cloth over skin etc with a watered down streak of scorched brown and a little black.


Image
this is fairly like how the wights looked before i began with the codex grey. except this has a thin shadow grey undercoat also. i was going to go with the grey like the wights but i'd like to mess around with this, perhaps an invert painting, extreme shadows would be white and extreme highlights would be black or very dark like the shade is a vortex of shadow with a light or spirit protected inside.
i'll take as much step by step as i can with this one, i would have done it on the wights only my camera fell into water and i had to wait until it dried out, thank god it still works.

Image
...and then onto this.
Top
  Profile  
Reply with quote  
 Post subject:
PostPosted: Sun Apr 18, 2010 4:29 am 
Craftsman
Craftsman
User avatar
Offline

Joined: Mon Aug 31, 2009 10:27 am
Posts: 446
Location: Chiang Mai, Thailand
Images: 2
You've done a really good job on the wights, the transitions are very smooth. I can really see the benefit of using glazes.
Good luck with the shade, I really like the colours schemes you are using, it already looks better than GW's.

_________________
“But God demonstrates his own love for us in this: While we were still sinners, Christ died for us.” -Romans 5:8
Top
  Profile  
Reply with quote  
Display posts from previous:  Sort by  
Post new topic Reply to topic  [ 135 posts ]  Go to page Previous  1, 2, 3, 4, 5 ... 7  Next

All times are UTC


Who is online

Users browsing this forum: No registered users and 38 guests


You cannot post new topics in this forum
You cannot reply to topics in this forum
You cannot edit your posts in this forum
You cannot delete your posts in this forum
You cannot post attachments in this forum

Search for:
Jump to: