@ BilboOfTheWhiteTower; cheers man

Just two of the orcs left now, i think the next 12 will get painted much quicker thankfully. Specters got some cork, small stones and sand on their bases along with the goblin, just to be undercoated now
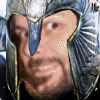
Specter.

Tided up his shoulders with some more cloth, still another little bit to go on his right leg, i might just cover it up with base detail.
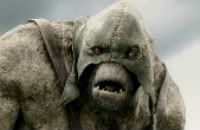
Orc 10
undercoated chaos black spray, a coat of water down chaos black, dry brushed lightly with codex grey, highlights receiving just a little extra codex.
1

Dry brush scorched brown.
2

]
Dry brush Kommando Khaki
3

Dry brush highlights Bleached bone.
4

Paint shoulder cloth and one of his leg cloth, Bow, Wrist guards, belt and straps with water down scorched brown. Perhaps 3 and with slightly more attention towards the raised areas, see the bow.
5

Skin Paint the raised areas with water down codex grey, one or two light layers should do it. Paint all the skin area with 1 part codex grew 3 parts water. this slowly blends the codex on the highlights with the shaded areas. (paint from the shade to the highlight) The more water you use the more layers it will take and gives you a better chance at making a smooth looking surface, however too much water and you'll be wasting time on unnecessary layering. Too much paint and it will ruin the shaded area.
6

Metal. Dry brush the helmet lightly with Boltgun metal, use a little water to moisten the brush so streaks wont appear. Use as little paint and water on the brush. Some of the brown may continue to show through but this just adds to the effect.
7

Shin guards and armor plates. Paint with 1 part botlgun 3 parts water. luckily the silver wont cover everything and some black and brown show through.
8

badab black all over his hair, it retains highlights from all the previous coats but darkens up more than everything else on the mini, it also looks greasy. Badab painted onto the front cloth between his legs along with the cloth under his wrist guard. The eyes, in between the fingers and along the center of the chest strap where given a thin coat of Badab. Watered down chaos black was applied lightly to areas where parts meet, like the knee and metal shin guard or the arm and wrist guard. Oh yeah, a little water down scorched brown in between the fingers makes the grey less cold. The shading could go further by using more and more chaos black. I would use Badab but it gets real shiny after a while, if that happens use watered down chaos black to mute it. Finally bleach bone was used to pick out the eyes and teeth

Done

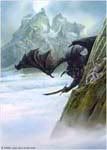
Wargs

I have the two other riders but wouldn't mind fielding them like this. little green work to be done on the wargs back's.
I'd completely forgotten about this guy, painted some time ago, I must have used every brownish and grey color I own dry brushing and glazing him, just got to do his eyes and a small bit of base work.


So, just going to finish those orcs, get the specters and goblin undercoated along with two barrow wights. might tackle the wargs and the 12 remainging orcs after that.
 Top
Top
 , I wonder how it would look on goblins
  .
.


 .
.


