All times are UTC


It is currently Sat Jun 22, 2024 10:55 am


Post new topic Reply to topic  [ 84 posts ]  Go to page 1, 2, 3, 4, 5  Next
Author Message
 Post subject: The Making of Barad-dûr (Update Nov 21st)
PostPosted: Fri Sep 04, 2009 7:33 pm 
Kinsman
Kinsman
User avatar
Offline

Joined: Sun Jun 01, 2008 8:03 pm
Posts: 128
The Making of Barad-dûr

Here it is: the first part of my WIP-thread about the Making of Sauron's Dark Tower. As Natarn already stated it takes a lot of time to write an article for even “a simple project” (do they exist?) but I’m really looking forward to give you the full story. You’ll have to be patient though – it might take a couple of months to write it all down.

Image

The story will come in chapters. To be honest, every chapter is a shortened version of a more elaborated story that can be found at the lotrscenerybuilder.org site – so if you want to read more, you’re welcome there. However, pasting the integral article into this forum would take a lot more space. Besides, you might not be interested in all this irrelevant lotrscenerybuilder twaddle…

I. ‘The iron crown of the topmost tower’

Image

During the preparation-stage I scanned the world wide web for usable pictures of Barad-dûr. Apart from the odd movie still I found a few pictures of the Sideshow polystone cast of the Dark Tower; they came up with a lot of details. Besides, I consulted the usual LOTR-hobbyist’s Bibles: the Appendices of the LOTR Extended DVD-set, Brian Sibley’s “The Making of the Movie Trilogy” and Gary Russell’s “The Art of the Return of the King”.

Image

For my first version of Barad-dûr I had used a cardboard tube with a diameter of 4inches/10,4cm. This time, I wanted to build on a slightly smaller scale; therefore I chose a tube with a diameter of 3inches/7,4cm for the central core. First thing I did was to mark out the different levels on the tube. For this I compared the width of the cylinder to the width of the tower in a picture of Barad-dûr (in: Sibley, page 55). This ratio became the standard for all further conversions. Next, I scaled up all distances proportionally.

Image

For the first version I had simply cut out the shape of the horns from a piece of fibreboard to create the topmost pinnacle. Nailing the correct silhouette took quite a few efforts though; the gap between the horns isn’t a randomly chosen crescent but has approximately a parabolic form. This time, I wanted to make a 3-D set of horns, true to the Weta model. The picture shows my first attempt to create a spatial framework that answered to the distinctive silhouette from all directions.

Image

When I was happy with the framework, I created a mantle by using small strips of cardboard.

Image

The picture shows the finished crown, with all the metal plating and spikes on top. The vertical 2mm cardboard strips against the outside were only added in the final stage.

Image

Gradually I worked my way downward. A section of the cardboard cylinder was removed and replaced by a panel with windows and arches (in retrospect, I would’ve liked to have even more difference in layers and depth on this particular level of the tower).

Image

Despite its scale and its wide diversity in details the Barad-dûr has only two major ‘key-problems’: the twin horns at the top and the ‘lop-ears’ on both sides of the pinnacle. I started with cardboard with a thickness of 2mm to model these ears. Likewise parabolic in form, I glued these four ‘pendants’ on top of each other against the tube. Small strips of cardboard filled up the space in between.

Image

However, the 2mm cardboard turned out to be the wrong choice: with the last ‘pendants’ glued in place, the tower seemed to have a set of antlers. Therefore I tore down the whole affair and had another try with flaps of 1mm cardboard.

Image

The balcony and the secondary pinnacles were made from MDF and jazzed up with cocktail-prickers and small bits of cardboard.

Image

I made little ‘noses’ of cardboard which were glued onto a cardboard ring; a cocktail-stick acted as a ‘spine’ for each nose. To give each spike a curve, the sticks were carefully broken in the middle and slightly bent apart. Filler was used to perfect their shape.

Image

There’s a lot that these pictures don’t show. For example, I had to remove an earlier version of this ring – already firmly glued to the tube – after concluding by hindsight that the position of the spikes differed from the movie pictures. I was however wrong-footed by a picture of Barad-dûr on page 60 in Sibley’s “Making of the Trilogy”, which shows these spikes in a more upright position and slightly further away from the tower (as far as I know there were at least two ‘bigatures’ or scale models built of the Dark Tower, apart from Mary MacLachlan’s earlier sculpture(s?); the one on page 60 figured in the Two Towers film poster, the (bigger) one on page 55 was used for the panning scenes in the first two movies).

Image

I used small strips of MDF – with different widths and lengths – for the receding buttresses against the tower-tube. After that, it became a matter of dressing up both these columns and the empty spaces between them.

Image

Windows, archways, cornices, pilasters and balconies were cut from cardboard: most of them many-layered, none alike. At this level the modelling was still clearly structured. Downwards, the fortress would expand ever more, with a proportional increase of details.

Image

Small details such as horns, spikes, strips and ribs were added to create the impression of intricate architecture. Later on, a layer of structure paint would hopefully deepen this illusion even more.

Image

It took a couple of days to decorate these columns all the way round. I didn’t have the patience to postpone the final painting until the moment the whole fortress would be completed. Instead, I decided to finish each stage separately; in the end I would apply a superficial, overall finish to integrate all parts into a single miniature.

Image

The most demanding part of every building project is taking the ceremonial photographs. There’s always more about a miniature than meets the lens! The first pictures of the ‘topmost tower’, however, showed some black looks… which raised my hopes.

(to be continued)

_________________
Ab hac die aut deserta tene aut in mare demerge


Last edited by lotrscenerybuilder on Sat Nov 21, 2009 7:11 pm, edited 5 times in total.
Top
  Profile  
Reply with quote  
 Post subject:
PostPosted: Fri Sep 04, 2009 7:43 pm 
Administrator
Administrator
User avatar
Offline

Joined: Mon Feb 09, 2004 5:44 pm
Posts: 1494
Location: Lokeren, Belgium
My mouth just turned into a breathed dam releasing a river of drool!
Thanks for that series mate! STUNNING!!!

I want that! :D

_________________
CMON-gallery
Top
  Profile  
Reply with quote  
 Post subject:
PostPosted: Fri Sep 04, 2009 7:44 pm 
Elven Warrior
Elven Warrior
User avatar
Offline

Joined: Sun Jun 21, 2009 4:42 am
Posts: 854
Location: Las Vegas
Its hard to put into words just how spectacular this project is, the amount of effort and work that must have went into it is mind-boggling. Every thing about this piece of terrian is simply wonderful, the details are astounding. You've really out done yourself here, lotrscenerybuilder. This is easily the best piece of terrain I've ever seen. :yay:

_________________
" I think I'm... quite ready for another adventure!"

Bilbo
Top
  Profile  
Reply with quote  
 Post subject:
PostPosted: Fri Sep 04, 2009 7:53 pm 
Administrator
Administrator
User avatar
Offline

Joined: Tue May 17, 2005 7:51 pm
Posts: 1130
Location: Porto - Portugal
Images: 27
Its amazing to see someone building this fortress... and the amount of details is simply gobsmacking!

I'm getting dizzy already and I'm not the one making it! lol

What a great work, keep it up! :D

_________________
Tell me... Do you bleed?
You will!
Chewy, we're home!
Top
  Profile  
Reply with quote  
 Post subject:
PostPosted: Fri Sep 04, 2009 10:27 pm 
Elven Warrior
Elven Warrior
Offline

Joined: Wed Mar 11, 2009 11:38 pm
Posts: 647
Location: Stealing something from your fridge
Could easily be an article :wink:

_________________
Hmm... what would a chair look like if your knees bent the other way?
Top
  Profile  
Reply with quote  
 Post subject:
PostPosted: Fri Sep 04, 2009 11:49 pm 
Wayfarer
Wayfarer
User avatar
Offline

Joined: Wed Apr 08, 2009 4:51 pm
Posts: 10
Location: Tidworth England
Wow 8)

_________________
oh the joy's of parenthood
Top
  Profile  
Reply with quote  
 Post subject:
PostPosted: Sat Sep 05, 2009 7:50 am 
Ringwraith
Ringwraith
User avatar
Offline

Joined: Mon Jul 18, 2005 2:56 pm
Posts: 3736
Location: The Height of Nonsense
How the Hell do you do that? It takes me hours to work out something a lot more simple.... :-X
But I do feel slightly better that this is a small scale version, not 28mm scale... that would really be quite.... vexing. You have a great talent for isolating the basic components of each structure. Best of luck with it!

_________________
Published ebooks:
Instrument of the Empire
A Note of Defiance
Phantom Ships, Ghost Flotilla
More to come!
Top
  Profile  
Reply with quote  
 Post subject:
PostPosted: Sat Sep 05, 2009 9:47 am 
Elven Warrior
Elven Warrior
Offline

Joined: Sun Feb 22, 2009 4:46 pm
Posts: 881
Location: United Kingdom
AMAZING! I love the amount of detail. :yay:

_________________
TO9G - 2010 Isengard
Top
  Profile  
Reply with quote  
 Post subject:
PostPosted: Mon Sep 07, 2009 5:12 pm 
Kinsman
Kinsman
User avatar
Offline

Joined: Mon Dec 04, 2006 4:46 pm
Posts: 68
Location: a chair
Thank you so much for posting this, I am really enjoying the making of barad dur, :D It makes the brilliance possible to comprehend!

_________________
what is 'signature'
Top
  Profile  
Reply with quote  
 Post subject:
PostPosted: Tue Sep 08, 2009 7:41 pm 
Elven Warrior
Elven Warrior
User avatar
Offline

Joined: Fri Mar 02, 2007 8:05 pm
Posts: 843
Location: Ultra top secret
Images: 7
:o 8) :sad: :yay:
Brilliant! Absolutely brilliant!

_________________
Painting again...
Top
  Profile  
Reply with quote  
 Post subject:
PostPosted: Wed Sep 09, 2009 9:07 pm 
Kinsman
Kinsman
Offline

Joined: Sun Apr 05, 2009 8:04 am
Posts: 65
Location: Bear Flag Republic
You, sir, have an amazing talent. Just. So. Cool. As is all of your work.

Just amazing...
Top
  Profile  
Reply with quote  
 Post subject:
PostPosted: Wed Sep 09, 2009 9:21 pm 
Elven Warrior
Elven Warrior
User avatar
Offline

Joined: Mon Feb 19, 2007 12:23 pm
Posts: 760
The amount of detail on this is staggering. Truly a magnificent build.

The best part for me is that you make it look like any mere mortal, and not only a corrupt Maia, can build this fortress .. I think you even beat the big man on the aspect of time! 8)
Top
  Profile  
Reply with quote  
 Post subject:
PostPosted: Thu Sep 10, 2009 2:17 am 
Kinsman
Kinsman
User avatar
Offline

Joined: Thu Feb 26, 2009 2:12 am
Posts: 90
Location: California!
Images: 1
To put it simply, you work is certianly inspireing. The detail present is a true acomplishment! Each tiny piece placed, possibly never to be noticed individually, but when set together, make this piece truely outstanding! Looking very much forward to the end of this project

_________________
"...all we have to decide is what to do with the time that is given to us." -Gandalf The fellowship of the Ring
Top
  Profile  
Reply with quote  
 Post subject:
PostPosted: Thu Sep 10, 2009 7:19 pm 
Kinsman
Kinsman
User avatar
Offline

Joined: Sun Jun 01, 2008 8:03 pm
Posts: 128
The BucklandNazgûl wrote:
Quote:
I want that!

lotrscenerybuilder says: If you want it – come and claim it!

Thank you all, guys! The best part of writing these stories is to read your comments! 8) At the moment, the 2nd and 3rd part are in the pipeline. Hopefully somewhere at the end of next week I’ll be able to post the next update.

@ Dorthonion: it does take me hours to work out all these individual (key-) parts. But your words are very true – actually, they run a bit ahead of my story: because that’s how I work on these miniatures: I try to focus on a single detail to keep things simple and only when I’ve finished & gathered all these details I put them together, building up a tower, a statue or whatever (a more elaborated version of the theory comes with the 2nd update). But of course it’s not quite as simple as that: you need to keep an eye on the whole as well.

@ Radagast the white & Joansean: when it comes to it, the whole building is little more than a cardboard Christmas tube decorated with more cardboard, wood & sticks. In time, I will show you all my tricks - at the risk of ruining the “brilliance”. :(

_________________
Ab hac die aut deserta tene aut in mare demerge
Top
  Profile  
Reply with quote  
 Post subject:
PostPosted: Thu Sep 10, 2009 8:33 pm 
Elven Warrior
Elven Warrior
Offline

Joined: Mon Sep 01, 2008 11:24 pm
Posts: 775
Location: United States
Images: 16
lotrscenerybuilder wrote:
lotrscenerybuilder says: If you want it – come and claim it!


I will!
Top
  Profile  
Reply with quote  
 Post subject:
PostPosted: Thu Sep 10, 2009 8:50 pm 
Loremaster
Loremaster
User avatar
Offline

Joined: Fri Jan 18, 2008 5:03 pm
Posts: 1984
Location: Manitoba, Canada
Images: 1
lotrscenerybuilder wrote:
When it comes to it, the whole building is little more than a cardboard Christmas tube decorated with more cardboard, wood & sticks. In time, I will show you all my tricks - at the risk of ruining the “brilliance”. :(
:o :? I do not think anything other than saying that the tower is actually an image from the movie could wreck the "Brilliance". :yay: 8)

If you think about it most terrain is "cardboard, wood, and sticks" to some extent, or in onyx's helms deep case, plaster. Imho what it is made of makes no matter, if you made such a stunning thing out of such unstunning and normal things then you are all the more a creative and great scenery maker. :)
Top
  Profile  
Reply with quote  
 Post subject:
PostPosted: Sat Sep 26, 2009 10:47 am 
Kinsman
Kinsman
User avatar
Offline

Joined: Sun Jun 01, 2008 8:03 pm
Posts: 128
Joansean wrote:
Quote:
The best part for me is that you make it look like any mere mortal, and not only a corrupt Maia, can build this fortress…

I think the next two chapters are going to endorse Joansean’s remark. Of course I understand that not everybody is as clever with his hands as some of the artists here at the One-Ring. But building scenery really starts with having the pluck and the will to create. Often it’s the work of other people that gives you inspiration, new ideas… and all the tricks! When it comes to the point I’m only copying what has already been contrived by others.

lotrscenerybuilder says:
“Do take me for some conjurer of cheap tricks!”

But at least I don’t have to confess that the tower is actually an image of the movie… :-D


IV. ‘Great courts and dungeons, eyeless prisons’

Image

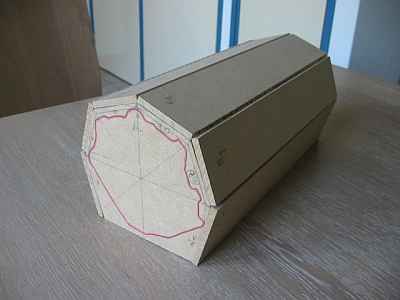
While the lower walls and battlements of the Dark Tower have a more or less uniform structure, the middle section is a hotchpotch of turrets, galleries, fences and (flying) stairways. On first sight this cluster of buildings looked fairly intimidating but thanks to my earlier experiences I had a clear plan of attack. For starters, I constructed a polygonal box of MDF which had to become the core of the middle section (I think it’s easier to add elements to an existing core than to run up a structure ‘from scratch’). The red circumference marks out the perimeter on top of the tower-base, which had to stay vacant.

Image

The movie images show a kind of corrugated iron plating behind the centre stronghold. This was easily imitated by a series of small, vertical cardboard strips against the front faces (left in the picture). Most of the plating would disappear in due time behind rockeries. With a marker, I outlined these future formations. The wall on the right was placed slightly backwards in order to create shadowy recesses that made the architecture looking less predictable.

Image

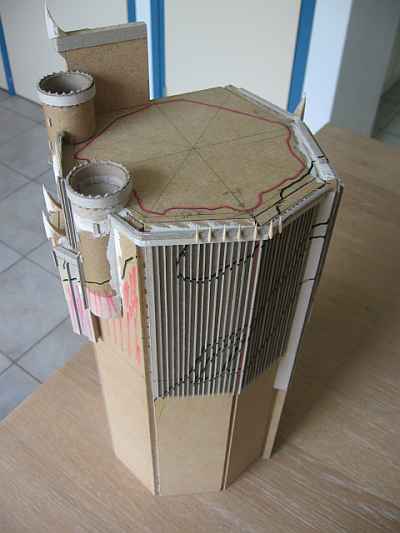
On the left I hung up a few turrets, along with a monumental balcony. Instead of inserting intact cylinders into the box I removed sections of the tubes. Further below, the entire face would get covered by the outcrops of the Ered Lithui.

Image

Sections of smaller tubes were used for the towers in the front. To obtain the correct diameters I cut away vertical strips from the cylinder mantles and forced both ends back together.

Image

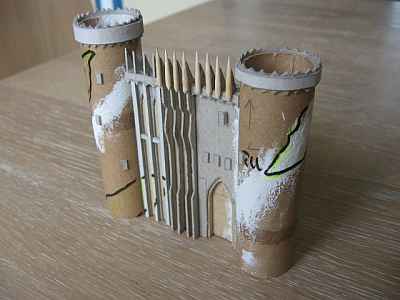
At first glance, the architecture of the Dark Tower makes an incoherent and complicated impression. But if you take a closer look, say, halfway up the building, this medieval stronghold looms up: some castle-walls, embattled, pierced by embrasures and flanked by belvederes; an arched gateway gives entry to this part of the fortress. It is the composition of some identical shaped arcades that makes up the gateway. It is the arrangement between the gateway, the walls and the belvederes that makes up the stronghold. It is the accumulation of battlements, strongholds, pinnacles and horns that makes up the Barad-dûr…

Image

What I’m trying to say is this: every miniature is the sum of all parts. While working on a big-scale model like the Barad-dûr I try not to become disheartened by the magnitude of the overall picture. Instead, my creativeness is solely focussed upon a single element: a belvedere, a wall, a gate. Thus, I forget about the rest of the tower and build, say, this gate. Next, I forget about most of the rest of the tower AND the gate and build the adjoining wall. In this manner I plod on until gate, walls and belvederes are completed. Of course the final arrangement of these parts is nothing but a copy of the fantasy of the Weta-designers: it is achieved by moving the parts about until I’m happy with the resemblance. After that, the lot is glued together.

Image

But let’s not trivialize the undertaking: without an eye for proportions, any familiarity with spatial construction and a great deal of patience, certain modelling hurdles may become insurmountable.

An extra layer of 1mm MDF raised the surface after it became clear that I had misjudged some heights. For a while I wasn’t sure about the exact position of the stronghold with respect to the box. In the end, I settled for the yellow markings.

Image

More wallpaper was added to create a seamless transition between the buildings in the front and the main structure behind it. Small variations in width produced a relief which broke the monotony and increased the suggestion of complexity.

Image

My source material gave me a rather foggy notion of the ramparts that surround the central stronghold: a jungle of corrugated barrages, most of them crowned with needles and pins. Where the picture wasn’t clear I had to improvise. By turns I used ‘harmonicas’ and ‘strip-curtains’.

Image

In the end, the stronghold was glued onto the main frame. The surrounding fences however were only temporarily put in place to get the picture; it would have been impractical to have them obstructing the upcoming carving of the lower rock-work.


V. ‘The vast shades amid which it stood’

Image

I used polyurethane foam to create the rocks. I installed some sheet piling in the back which had to guide my hobby-knife during the modelling of the foam. The internet pictures were there all the time to check up my mountain silhouette with the images of the movie tower.

Image

In contrast to the delicate fumbling with cardboard & sticks, squirting foam onto your precious miniature is a brutal and nerve-racking act, making you pray for its survival. I have learned by bitter experience to protect the no-go areas from this gluey stuff with bits of paper.

Image

But when the foam has cured after a couple of hours without damaging any vital parts, it suddenly looks a lot friendlier. With the movie stills in front of me I started to model the foam.

Image

What I do is: I make shallow incisions in the foam with a hobby knife and then tear away small quantities. As a result you get by turns these rough and smooth surfaces which resemble the look of natural stone.

Image

… or that’s the theory, anyway.
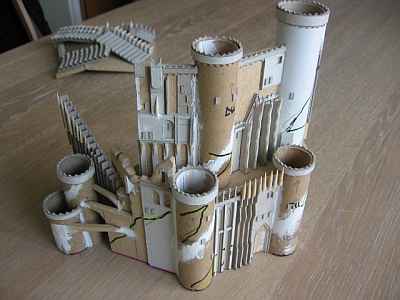
Apart from the striking rock formations against the tower’s middle regions there are also a few smaller, isolated outcrops breaking through the walls of the stronghold. I studied the pictures carefully, not wanting to miss any of them. When the sculpting was done I glued the fencing to the ground plate. Small broken stones and a layer of structure paint were added to the model.

Image

I have shown you how this stronghold was built up by putting all these separately prepared walls, towers, fences and rocks together. Now, with everything covered with a uniform layer of brownish-greenish-black paint the composition as a whole suddenly made a lot more sense while, at the same time, the Orcish building plan lost a good deal of its transparency.

Image

Here it was, Tolkien’s “… towers and battlements, tall as hills, founded upon a mighty mountain-throne […], great courts and dungeons, eyeless prisons sheer as cliffs, and gaping gates of steel and adamant…”


(to be continued)

_________________
Ab hac die aut deserta tene aut in mare demerge
Top
  Profile  
Reply with quote  
 Post subject:
PostPosted: Sat Sep 26, 2009 11:54 am 
Elven Warrior
Elven Warrior
Offline

Joined: Sun Feb 22, 2009 4:46 pm
Posts: 881
Location: United Kingdom
It's really interesting to see how you built it. Thanks lotrscenerybuilder! 8)

_________________
TO9G - 2010 Isengard
Top
  Profile  
Reply with quote  
 Post subject:
PostPosted: Sat Sep 26, 2009 11:56 am 
Administrator
Administrator
User avatar
Offline

Joined: Mon Feb 09, 2004 5:44 pm
Posts: 1494
Location: Lokeren, Belgium
I love you! :oops:

8) that's just too much for words mate, superb! :yay:

_________________
CMON-gallery
Top
  Profile  
Reply with quote  
 Post subject:
PostPosted: Sat Sep 26, 2009 12:30 pm 
Elven Warrior
Elven Warrior
User avatar
Offline

Joined: Mon Feb 19, 2007 12:23 pm
Posts: 760
Truly stunning!

You must be truly adamant if you can put yourself to design and complete all these gorgeous projects! :yay:
Top
  Profile  
Reply with quote  
Display posts from previous:  Sort by  
Post new topic Reply to topic  [ 84 posts ]  Go to page 1, 2, 3, 4, 5  Next

All times are UTC


Who is online

Users browsing this forum: No registered users and 69 guests


You cannot post new topics in this forum
You cannot reply to topics in this forum
You cannot edit your posts in this forum
You cannot delete your posts in this forum
You cannot post attachments in this forum

Search for:
Jump to: