All times are UTC


It is currently Mon Oct 07, 2024 3:21 am


Post new topic Reply to topic  [ 12 posts ] 
Author Message
 Post subject: A very slow Orc WIP
PostPosted: Tue Aug 06, 2013 8:43 pm 
Craftsman
Craftsman
User avatar
Offline

Joined: Sat Feb 14, 2009 2:59 pm
Posts: 424
Location: Britain
I still don't have any kind of decent photography setup yet, so nothing but phone pictures to start out. Still, they should be sufficient to give you a sense of what I'm working on (at an agonizingly slow pace)

Morannon orcs ready for basecoating: this batch have all had minor greenstuff work to flesh out the details a little. They're mounted on resin bases from Dragonforge.

Image

Orc captain in the process of being painted. Just the cloth and armour is finished so far.

Image
Image
Image

The armour is a fairly straightforward process of washing and re-highlighting until it looks battered enough - it's quite fun to do, I plan on using the same techniques for all my orcs. A few years ago I painted a few Morannon orcs by drybrushing and washing teir armour, and while it didn't look terrible, I've found it's a lot more satisfying to put the extra time and effort in to do everything with layering.

The battle damage is somewhat rudimentary, I haven't been doing it for very long (this is only my second shot at the technique) but I learned quite a bit already from working on this model and I hope to refine the effect in the future.

Hopefully there will be more before too long. Starting the cleanup work on some of the new fell wargs today.

Thanks for looking! Any feedback appreciated.

_________________
Talaan-u rûk-ir tor Urûk
Nauru-ir agh kragoru nûrsu grishûrz
Nork-ulu furtun agh goð
Mordor-ob bot-tuk
Top
  Profile  
Reply with quote  
 Post subject: Re: A very slow Orc WIP
PostPosted: Tue Aug 06, 2013 9:00 pm 
Kinsman
Kinsman
User avatar
Offline

Joined: Mon Oct 08, 2012 2:55 pm
Posts: 221
Fantastic painting, the metals are unbelievably realistic.

_________________
My Youtube Channel
Top
  Profile  
Reply with quote  
 Post subject: Re: A very slow Orc WIP
PostPosted: Tue Aug 06, 2013 9:02 pm 
Elven Warrior
Elven Warrior
User avatar
Offline

Joined: Thu Feb 09, 2012 10:19 pm
Posts: 900
Location: Essex England
Looks amazing so far :yay:

_________________
You would of had me crawling on all fours like a BEAST!
Top
  Profile  
Reply with quote  
 Post subject: Re: A very slow Orc WIP
PostPosted: Wed Aug 07, 2013 4:40 am 
Loremaster
Loremaster
User avatar
Offline

Joined: Sat Oct 09, 2010 11:20 am
Posts: 1776
I really like your bases, how did you do them?
Top
  Profile  
Reply with quote  
 Post subject: Re: A very slow Orc WIP
PostPosted: Wed Aug 07, 2013 4:55 am 
Elven Elder
Elven Elder
User avatar
Offline

Joined: Thu Aug 13, 2009 6:37 am
Posts: 3499
Location: Hull UK
Images: 14
sometimes the simple paint schemes work best and for Orcs this couldnt be better. Great stuff.

_________________
Commission Service Available

mallysminiatures.blogspot.co.uk
Top
  Profile  
Reply with quote  
 Post subject: Re: A very slow Orc WIP
PostPosted: Wed Aug 07, 2013 11:56 am 
Kinsman
Kinsman
Offline

Joined: Fri Jun 21, 2013 3:36 pm
Posts: 62
Location: Deep Forests of Småland, Sweden
Images: 1
The head "trophy" is looking very realistic and the base is stunning. Overall an excellent paint job. :)

_________________
Check out my W.I.P Painting, Terrain and Conversions!
Top
  Profile  
Reply with quote  
 Post subject: Re: A very slow Orc WIP
PostPosted: Wed Aug 07, 2013 2:07 pm 
Wayfarer
Wayfarer
Offline

Joined: Sat Aug 03, 2013 10:04 am
Posts: 5
Very nice so far. I agree that taking your time to do the layering is worthwhile, it really does look a lot better on metalics than drybrushing.

_________________
https://miniaturemiscellany.wordpress.com/
Top
  Profile  
Reply with quote  
 Post subject: Re: A very slow Orc WIP
PostPosted: Fri Aug 16, 2013 9:17 pm 
Craftsman
Craftsman
User avatar
Offline

Joined: Sat Feb 14, 2009 2:59 pm
Posts: 424
Location: Britain
Thanks all!

Sticky Fingersss wrote:
I really like your bases, how did you do them?

The bases themselves are these (which I highly recommend in terms of product quality) and in terms of painting, the stone is painted a dark grey and drybrushed progressively lighter, with a bit of old dheneb stone before the final light grey stage to give it some warmth. The mud was painted scorched brown, overbrushed bestial brown and then graveyard earth, drybrushed with a mix of graveyard earth and bleached bone, and then heavily washed with devlan mud. I'm going to have to tweak the process a bit for the new citadel colours sooner or later.

Those are old colours, of course: I think rhinox hide, mournfang, steel legion drab and ushabti bone should produce the same basic results, but I haven't tested this out yet. Of course, agrax earthshade and devlan mud are completely different, so you'd need army painter's strong tone ink to replace that (it's almost identical and I recommend everyone pick up a bottle because it's really useful and we're all going to run out of devlan mud eventually)

_________________
Talaan-u rûk-ir tor Urûk
Nauru-ir agh kragoru nûrsu grishûrz
Nork-ulu furtun agh goð
Mordor-ob bot-tuk
Top
  Profile  
Reply with quote  
 Post subject: Re: A very slow Orc WIP
PostPosted: Fri Aug 16, 2013 9:32 pm 
Kinsman
Kinsman
User avatar
Offline

Joined: Wed Jun 11, 2008 4:06 pm
Posts: 73
Location: Warsaw, Poland
Nice armour! looking forward for updates ;)
Top
  Profile  
Reply with quote  
 Post subject: Re: A very slow Orc WIP
PostPosted: Sat Aug 17, 2013 12:09 pm 
jmh_stirling wrote:
I love the armour - can you give a step by step guide on how you do it (with pics, pretty please)? It looks incredible. Kudos.


+1 for this! The armour is incredible!! :yay:
Top
   
Reply with quote  
 Post subject: Re: A very slow Orc WIP
PostPosted: Sat Aug 17, 2013 8:26 pm 
Elven Warrior
Elven Warrior
User avatar
Offline

Joined: Fri Mar 05, 2010 3:34 pm
Posts: 928
Location: The U.S.
Images: 1
Nice work on the armor! The captain is one of my favorite sculpts, and is very fun to paint.

-PoW

_________________
My WIP thread: http://one-ring.co.uk/viewtopic.php?f=50&t=18247
Top
  Profile  
Reply with quote  
 Post subject: Re: A very slow Orc WIP
PostPosted: Sun Aug 18, 2013 10:10 pm 
Craftsman
Craftsman
User avatar
Offline

Joined: Sat Feb 14, 2009 2:59 pm
Posts: 424
Location: Britain
jmh_stirling wrote:
I love the armour - can you give a step by step guide on how you do it (with pics, pretty please)? It looks incredible. Kudos.

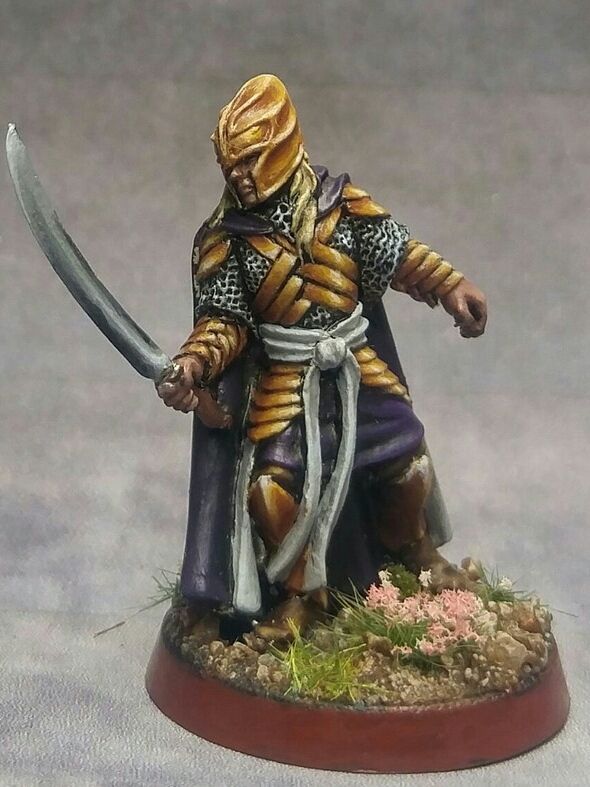
Cheers! And yes, this is something I definitely plan on doing as soon as I can figure out a decent photography setup (and get my hands on a good camera)

The exact process varies from mini to mini, since the washing and rehighlighting is done until it looks "right" but the basic process is:

Basecoat GW boltgun metal or Army Painter gunmetal (I don't recommend using new GW leadbelcher)

Wash with slightly thinned black (I use GW badab black while I still have some, but AP dark tone ink is supposed to be the best replacement)

Re-highlight with gunmetal, leaving the recesses shaded. This forms the foundation for the rest of the work to come.

Wash again, 3-4 times. Keep the washes light and thin, and be careful they don't pool up. I do most of this with a GW detail brush for control of exactly what and where gets tinted by the washes. For the second or third of these washes, switch from black to brown (or mix the two) to add some warmth to the shadows and give the metal a subtle dirty feel. Again, old devlan mud was great for this - thinning down the new agrax earthshade and mixing it with a black wash will do, and AP strong tone ink is very similar to old devlan.

Edge highlight. Gunmetal first, followed by a thinner, finer highlight of chainmail (AP plate mail) and finally a sparse highlight of mithril where you want the "bright spots" to be. Some of the chips and dents were added at this stage too, with a mix of black and a tiny bit of very dark brown underlined with mithril.

Washes again, much thinner, more like glazes. Anywhere between one and ten, with additional edge highlighting and battle damage thrown in until it looks right. This is where I added most of the brown tint, as I wanted the bulk of the metal highlights and shades in place before adding the grime.

Finally, the "fresh" battle damage (which won't be tinted by any glazes) is the last thing to go on, along with a final, fine highlight of thinned mithril on the bright spots.

One unorthodox thing I did while working on this mini (which I haven't tried before) was to add to the beaten-up look of the metal on the back of the cuirass by thinning gunmetal down to a glaze with a mix of flow improver, glaze medium and water, and applying it carefully with a very fine brush. that effectively scattered the little silver flakes that give metallic paints their shine unevenly over the surface - I wasn't sure how well it would work out, but after a couple of glazes I'm very happy with the result, it looks like a scattering of tiny chips and nicks. You could just use metallic medium for this, but I don't have any.

That turned into a bigger post than I intended, but i hope it helps~

_________________
Talaan-u rûk-ir tor Urûk
Nauru-ir agh kragoru nûrsu grishûrz
Nork-ulu furtun agh goð
Mordor-ob bot-tuk
Top
  Profile  
Reply with quote  
Display posts from previous:  Sort by  
Post new topic Reply to topic  [ 12 posts ] 

All times are UTC


Who is online

Users browsing this forum: No registered users and 13 guests


You cannot post new topics in this forum
You cannot reply to topics in this forum
You cannot edit your posts in this forum
You cannot delete your posts in this forum
You cannot post attachments in this forum

Search for:
Jump to: