All times are UTC


It is currently Sun Oct 06, 2024 4:18 pm


Post new topic Reply to topic  [ 527 posts ]  Go to page Previous  1 ... 12, 13, 14, 15, 16, 17, 18 ... 27  Next
Author Message
 Post subject: Re: Gandlaf The Grey WIP - Tom Bombadil Finished 07/06
PostPosted: Fri Jun 07, 2013 9:26 pm 
Loremaster
Loremaster
User avatar
Offline

Joined: Mon Jan 14, 2013 2:49 pm
Posts: 1038
Location: Germany
Perfect! Will a Goldberry follow this little guy?

_________________
Check out my WIP: www.one-ring.co.uk/viewtopic.php?f=50&t=24858
Top
  Profile  
Reply with quote  
 Post subject: Re: Gandlaf The Grey WIP - Tom Bombadil Finished 07/06
PostPosted: Fri Jun 07, 2013 10:25 pm 
Elven Elder
Elven Elder
User avatar
Offline

Joined: Thu Aug 13, 2009 6:37 am
Posts: 3499
Location: Hull UK
Images: 14
Harfoot wrote:
Brilliant, spill the beans, how did you make them?


It couldn't have been more simple. Having done some searching about I felt what i needed was a globule of paint on a stem. Normal PVA glue wouldn't do the job so I tried some scatter glue from Antenociti's Workshop. I mixed this glue with the paint of my choice and loaded the brush so I had a drop on the end of the brush. This allowed me to transfer this onto the grass. So the flowers actually took me less than five minutes in total.

Rognarr wrote:
Perfect! Will a Goldberry follow this little guy?


Sadly no. I don't have a Goldberry and if I did then you know a diorama of some ilk would have followed.

_________________
Commission Service Available

mallysminiatures.blogspot.co.uk
Top
  Profile  
Reply with quote  
 Post subject: Re: Gandlaf The Grey WIP - Tom Bombadil Finished 07/06
PostPosted: Sun Jun 09, 2013 4:48 pm 
Elven Elder
Elven Elder
User avatar
Offline

Joined: Thu Aug 13, 2009 6:37 am
Posts: 3499
Location: Hull UK
Images: 14
Image
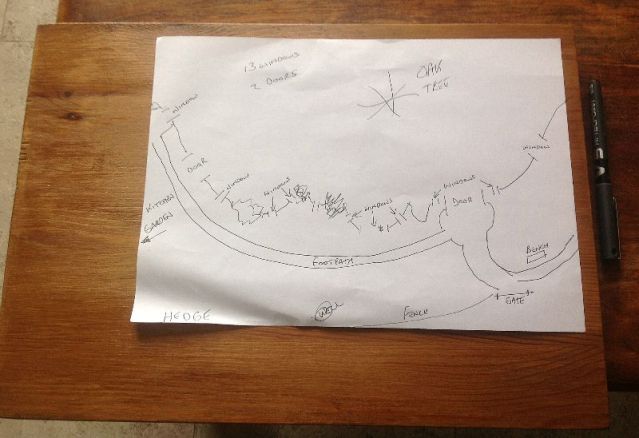
Above is my current plan layed out on a sheet of A4 on the plinth I have made. The one I ordered never happened so I ended up cutting up an old shelf and staining it. It's a little big but I wanted the room to fit everything else in.
A you may see Bag End is bigger than you think. After much research I discovered 13 windows and 2 doors.
These doors are connected by a path with a kitchen garden outside the back door.
The main road will run at the front of the sheet of paper and curve around to the left side (as you look)
I've left plenty of room for a big oak tree, which is what I want.
The first problem is I don't have the styrene I thought I had to pack out the base. Never mind, I'm sure this won't be the first issue I discover while working on this.
I've already thought of putting a pond to the front of the base. It may not be true to the book or film but will make a nice addition.

_________________
Commission Service Available

mallysminiatures.blogspot.co.uk
Top
  Profile  
Reply with quote  
 Post subject: Re: Gandlaf The Grey WIP - Bag End
PostPosted: Sun Jun 09, 2013 7:04 pm 
Ringwraith
Ringwraith
User avatar
Offline

Joined: Tue Jul 20, 2010 2:33 pm
Posts: 2145
Location: South West England, UK
Plans look good, so just to get it right, you mixed the glue into the paint?

_________________
Harfoots-The first of the Hobbit people to cross over the Misty Mountains and enter Eriador.
Top
  Profile  
Reply with quote  
 Post subject: Re: Gandlaf The Grey WIP - Bag End
PostPosted: Sun Jun 09, 2013 7:12 pm 
Elven Elder
Elven Elder
User avatar
Offline

Joined: Thu Aug 13, 2009 6:37 am
Posts: 3499
Location: Hull UK
Images: 14
Harfoot wrote:
so just to get it right, you mixed the glue into the paint?

Yes, no water. You want it thick

_________________
Commission Service Available

mallysminiatures.blogspot.co.uk
Top
  Profile  
Reply with quote  
 Post subject: Re: Gandlaf The Grey WIP - Bag End
PostPosted: Sun Jun 09, 2013 7:59 pm 
Ringwraith
Ringwraith
User avatar
Offline

Joined: Tue Jul 20, 2010 2:33 pm
Posts: 2145
Location: South West England, UK
Thanks, will give it a try

_________________
Harfoots-The first of the Hobbit people to cross over the Misty Mountains and enter Eriador.
Top
  Profile  
Reply with quote  
 Post subject: Re: Gandlaf The Grey WIP - Bag End
PostPosted: Wed Jun 12, 2013 8:07 pm 
Kinsman
Kinsman
User avatar
Offline

Joined: Wed Aug 13, 2008 10:59 am
Posts: 247
Location: England
The face on Bombadil is superb, the red cheeks are spot on.
Top
  Profile  
Reply with quote  
 Post subject: Re: Gandlaf The Grey WIP - Bag End
PostPosted: Wed Jun 12, 2013 9:31 pm 
Loremaster
Loremaster
User avatar
Offline

Joined: Mon Jan 14, 2013 2:49 pm
Posts: 1038
Location: Germany
Hey Gandlaf, it took me a while, but I found the file about the hobbit holes, and for you the good news is probably: even in English. Hope it's not too late and still of help for you! Have fun ;)

http://fc02.deviantart.net/fs70/f/2013/ ... 68s7aw.pdf

_________________
Check out my WIP: www.one-ring.co.uk/viewtopic.php?f=50&t=24858


Last edited by Rognarr on Thu Jun 13, 2013 12:29 am, edited 1 time in total.
Top
  Profile  
Reply with quote  
 Post subject: Re: Gandlaf The Grey WIP - Bag End
PostPosted: Wed Jun 12, 2013 11:13 pm 
Elven Elder
Elven Elder
User avatar
Offline

Joined: Thu Aug 13, 2009 6:37 am
Posts: 3499
Location: Hull UK
Images: 14
CaptainOfTheWhiteTower wrote:
The face on Bombadil is superb, the red cheeks are spot on.

Thanks Capt

Rognarr, thanks for this and for keeping looking. It will help me with an issue I have around setting a recess in the door frame.
I'm after this model being a very articulate affair with maximum detail so very little bit will help me.
I got my polystyrene today and the first piece has been glued on - and so it begins

_________________
Commission Service Available

mallysminiatures.blogspot.co.uk
Top
  Profile  
Reply with quote  
 Post subject: Re: Gandlaf The Grey WIP - Bag End
PostPosted: Thu Jun 13, 2013 12:28 am 
Elven Elder
Elven Elder
User avatar
Offline

Joined: Thu Apr 01, 2010 11:33 pm
Posts: 3688
Location: Atlanta GA. U.S.A.
Images: 14
I wanted to make sure you have this link 8)
http://lotrscenerybuilder.org/hobbiton_project_def.php

_________________
"the same as a duck you must be made of wood"
Top
  Profile  
Reply with quote  
 Post subject: Re: Gandlaf The Grey WIP - Bag End
PostPosted: Thu Jun 13, 2013 1:49 am 
Elven Elder
Elven Elder
User avatar
Offline

Joined: Thu Aug 13, 2009 6:37 am
Posts: 3499
Location: Hull UK
Images: 14
Wow, some serious work there. Thanks mate

_________________
Commission Service Available

mallysminiatures.blogspot.co.uk
Top
  Profile  
Reply with quote  
 Post subject: Re: Gandlaf The Grey WIP - Bag End
PostPosted: Fri Jun 14, 2013 2:38 pm 
Elven Elder
Elven Elder
User avatar
Offline

Joined: Thu Aug 13, 2009 6:37 am
Posts: 3499
Location: Hull UK
Images: 14
A simple question but I'm stuck. I'm trying to cut a perfect hole in a 4mm thick sheet of balsa wood and I can't do it for splinters and Raghu edges.
I've never worked with the stuff before so what the solution please ?

_________________
Commission Service Available

mallysminiatures.blogspot.co.uk
Top
  Profile  
Reply with quote  
 Post subject: Re: Gandlaf The Grey WIP - Bag End
PostPosted: Fri Jun 14, 2013 3:24 pm 
Elven Elder
Elven Elder
User avatar
Offline

Joined: Thu Apr 01, 2010 11:33 pm
Posts: 3688
Location: Atlanta GA. U.S.A.
Images: 14
Gandlaf the Grey wrote:
A simple question but I'm stuck. I'm trying to cut a perfect hole in a 4mm thick sheet of balsa wood and I can't do it for splinters and Raghu edges.
I've never worked with the stuff before so what the solution please ?


Balsa wood is very soft. How large of a hole? :roll: A drill may not be the solution for a window or a door.

Image

By Raghu edges I think you mean tear-out' To avoid tear out. Use a backing board/waste/Scrap and drill all the way through and into the waste board. Drill bit shape can be a factor too. I don't think a spade bit would work very well for example.

alternative to a drill
A compass equipped with a razor blade. I rarely use mine. I don't work with balsa much. It is very soft and fuzzy. Pun intended :lol:

Image

I included a photo.
I needed to add some circle cutters to my how to tool file.
I can't wait to see how it is going :)

_________________
"the same as a duck you must be made of wood"
Top
  Profile  
Reply with quote  
 Post subject: Re: Gandlaf The Grey WIP - Bag End
PostPosted: Fri Jun 14, 2013 5:24 pm 
Elven Elder
Elven Elder
User avatar
Offline

Joined: Thu Aug 13, 2009 6:37 am
Posts: 3499
Location: Hull UK
Images: 14
Thanks Charlie. I have various hole cutters but they are way to coarse for balsa. My initial attempts just tore it up and left chunks out of it and that was with using a clamped backing piece of waste wood.
This has caused me to re think my plan. I've got some display board card. It's about 2mm thick and I'm currently moulding Milliput around this to set the brickwork around the front door. If this goes well I will move onto the windows to each side of the door.
My initial test piece seemed to work well but I want to put an insert after the brickwork and then the door behind that.
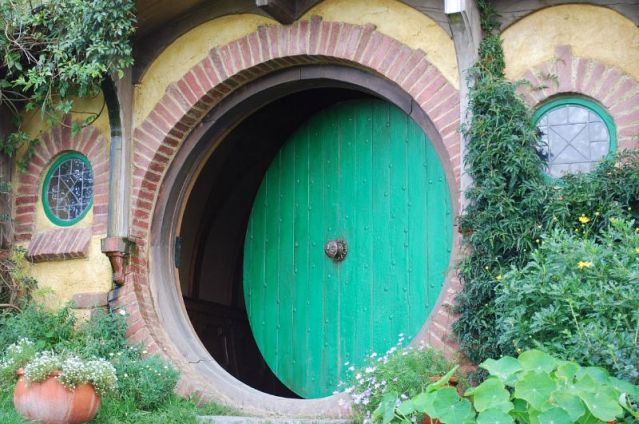
The below photo should give you the example I'm after replicating.
Image
I've gone thin with the brickwork like you see in the photo.
As for progress, well there's not much. I can't spend much time on this. I've done the base and glues a 25mm think piece of polystyrene to it. This will be the height of the gate.
The front door will be higher still. However I am working on each door and window as an individual piece. Once these are done I will fit them against another polystyrene sheet. Once these are fitted I can see how everything will come together and get some order to the chaos.
However, there's 13 windows and two doors to make. The reason I'm doing it this way is if I can't fit all the windows in I may need to ditch the odd one.

_________________
Commission Service Available

mallysminiatures.blogspot.co.uk


Last edited by Gandlaf the Grey on Fri Jun 14, 2013 6:23 pm, edited 1 time in total.
Top
  Profile  
Reply with quote  
 Post subject: Re: Gandlaf The Grey WIP - Bag End
PostPosted: Fri Jun 14, 2013 6:21 pm 
Elven Elder
Elven Elder
User avatar
Offline

Joined: Thu Apr 01, 2010 11:33 pm
Posts: 3688
Location: Atlanta GA. U.S.A.
Images: 14
Milliput is probably the best bet. All of the door and window frames seem unique. I hate MDFB for use in furnature. I use it more often than plywood for hobbies. I limit the use of balsa wood to flying model air planes. Almost any thing is better. A lot of people like it and don't seem to use much else.

Engraving medium density injected foam seems to be the rage now especially for people with a talent for drawing. 8)

_________________
"the same as a duck you must be made of wood"
Top
  Profile  
Reply with quote  
 Post subject: Re: Gandlaf The Grey WIP - Bag End
PostPosted: Fri Jun 21, 2013 12:59 pm 
Elven Elder
Elven Elder
User avatar
Offline

Joined: Thu Aug 13, 2009 6:37 am
Posts: 3499
Location: Hull UK
Images: 14
Image
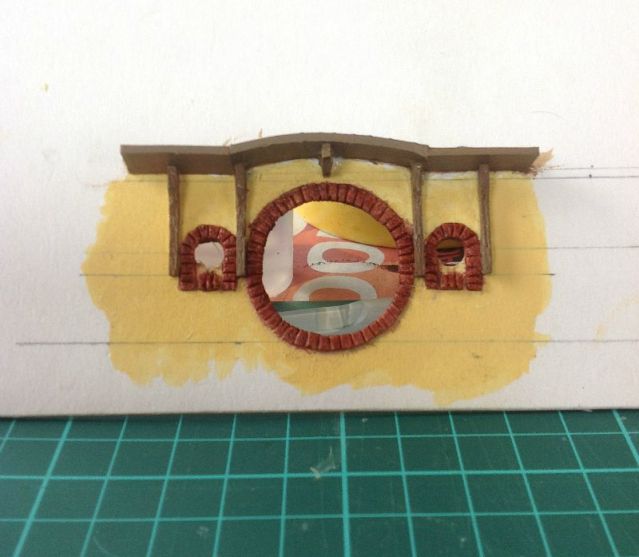
The above shows where I am at. What you see is the front entrance that I have base coated only. The painting needs loads more attention that it will get in due course.
I have my concerns though.
The door isn't 100% round and I'm hoping that is hidden slightly by the wooden struts.
The arch above the door isn't as round as I would have hoped but I couldn't use anything else other than card. Everything else split as I bent it !!!
I think the wooden arch is too high ?
My big problem though is cutting the holes true. I need to work out an inset piece for the doorframe but I will be honest, I'm struggling.
I haven't made the door yet but there are no issues I see with that, it will be a flat piece of wood glued to the back.

_________________
Commission Service Available

mallysminiatures.blogspot.co.uk
Top
  Profile  
Reply with quote  
 Post subject: Re: Gandlaf The Grey WIP - Bag End
PostPosted: Fri Jun 21, 2013 2:17 pm 
Elven Elder
Elven Elder
User avatar
Offline

Joined: Thu Apr 01, 2010 11:33 pm
Posts: 3688
Location: Atlanta GA. U.S.A.
Images: 14
The brick work looks good. 8)
I have struggled with using real wood in this scale. When I do manage to get it right the wood grain is out of scale. I am afraid you will have to use card or paper thin plywood for the door frame.There are laminated wood strips with adhesive backing available for edging plywood. You could try that. It is available in DIYS stores but the ultra thin plywood you will have to get that where they specialize in flying models.
I have used PVC pipe for hobbit door frames. I am afraid that wont help here.

_________________
"the same as a duck you must be made of wood"
Top
  Profile  
Reply with quote  
 Post subject: Re: Gandlaf The Grey WIP - Bag End
PostPosted: Fri Jun 21, 2013 2:34 pm 
Ringwraith
Ringwraith
User avatar
Offline

Joined: Tue Jul 20, 2010 2:33 pm
Posts: 2145
Location: South West England, UK
Hi G, Hobbycraft sell thin Plywood, well they did about a year ago.
It looks good, when everything is in place any "perfect circles" never notice, I am sure middle earth must have subsidence problems anyway!
Like the colours.

_________________
Harfoots-The first of the Hobbit people to cross over the Misty Mountains and enter Eriador.
Top
  Profile  
Reply with quote  
 Post subject: Re: Gandlaf The Grey WIP - Bag End
PostPosted: Fri Jun 21, 2013 3:18 pm 
Elven Elder
Elven Elder
User avatar
Offline

Joined: Thu Aug 13, 2009 6:37 am
Posts: 3499
Location: Hull UK
Images: 14
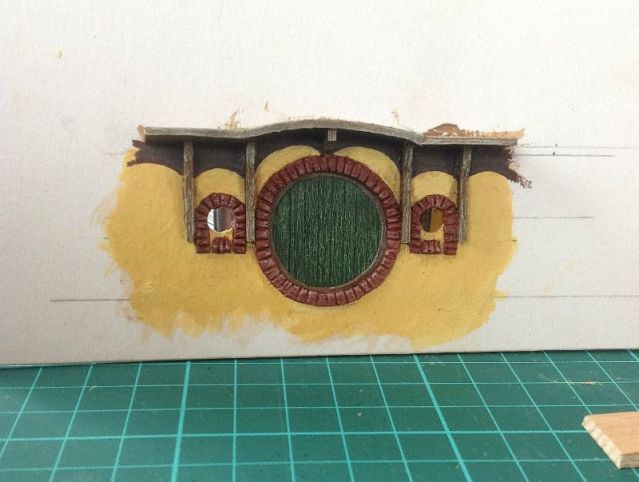
Image
A don't tell the wife moment. The recess is actually a wedding invite I found made of stiff card- perfect.
It isn't a true hole but I think near enough and some extra touches to the painting seems to hide it a bit. The vegetation I have planned could do the trick.
The windows are still to do as is the handle and a few rivets. They are all finishing touches but the bulk seems to be there.
What I should also say is the bottom pencil line you see is the ground level so the bottom part of the brick frame will be hidden.

_________________
Commission Service Available

mallysminiatures.blogspot.co.uk
Top
  Profile  
Reply with quote  
 Post subject: Re: Gandlaf The Grey WIP - Bag End
PostPosted: Fri Jun 21, 2013 4:05 pm 
Elven Elder
Elven Elder
User avatar
Offline

Joined: Thu Apr 01, 2010 11:33 pm
Posts: 3688
Location: Atlanta GA. U.S.A.
Images: 14
Very nice! How are you going to do the window glass?

_________________
"the same as a duck you must be made of wood"
Top
  Profile  
Reply with quote  
Display posts from previous:  Sort by  
Post new topic Reply to topic  [ 527 posts ]  Go to page Previous  1 ... 12, 13, 14, 15, 16, 17, 18 ... 27  Next

All times are UTC


Who is online

Users browsing this forum: No registered users and 238 guests


You cannot post new topics in this forum
You cannot reply to topics in this forum
You cannot edit your posts in this forum
You cannot delete your posts in this forum
You cannot post attachments in this forum

Search for:
Jump to: